Backyard Outdoor Kitchen and Dining: A Design That Works on Tuesday, Not Just Saturday
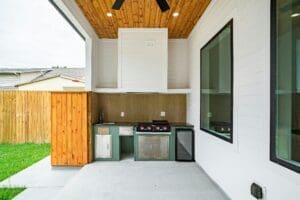
Image via Pexels
Homeowners planning a backyard outdoor kitchen and dining space are really designing a second living room with fire, water, and weather—which is why the best setups feel effortless and safe.
In a nutshell
- Decide how you’ll use it most often (quick weeknight dinner vs. hosting).
- Put the “hot zone” where smoke and heat won’t fight your house or guests.
- Choose materials that forgive sun, rain, grease, and freeze/thaw.
- Plan utilities early (electric, gas, water, drainage, lighting).
- Leave space to move, sit, and serve without bumping elbows.
The safety and comfort rules people forget
Heat and open flame change the usual backyard math. A few principles matter more than any trendy tile:
- Clearance matters. Grills and built-in appliances have manufacturer clearance requirements, especially near combustible materials—follow them.
- Distance from structures is not negotiable. Fire safety guidance commonly recommends keeping grills well away from the home and anything that can burn; some local guidance specifies minimum distances (often around 10 feet) from combustible construction.
- Plan for smoke and grease. Don’t place the grill under low eaves or directly under branches.
- Non-combustible build is the safer default. If you’re considering wood framing, understand the added risk and the importance of proper insulation/liners and appliance specs.
Compare common layout ideas
| Layout style | Best for | Watch-outs | Nice add-on |
| Straight run (single wall) | Smaller patios, tight budgets | Can bottleneck during parties | Rolling cart as extra prep |
| L-shape | Separate cook + prep nicely | Corner can waste space | Corner storage + trash pullout |
| U-shape | Serious hosting, multiple cooks | Takes room; can feel enclosed | A pass-through opening to dining |
| Island with seating | Casual hangouts | Guests too close to heat if misplanned | Raise bar top to separate zones |
Paying for premium upgrades without doing it all at once
If your backyard plan includes higher-end stone, built-in appliances, and custom masonry, the cost can climb quickly. Some homeowners look at financing options that spread those costs out—especially when the home itself has significant value. One avenue some people explore is to refinance jumbo loans, which can potentially free up equity or improve loan terms in certain situations. A jumbo mortgage can be refinanced much like a conventional mortgage, but often comes with specialized options for higher-value properties and asset-strong borrowers; it may be worth reviewing if your financial picture has improved since you first borrowed.
Materials and surfaces: choose “boring” on purpose
Outdoor materials have enemies: UV, water, heat, grease, and time.
- Countertops: Stone and concrete are popular; whichever you choose, prioritize heat resistance and easy cleanup.
- Cabinetry: Stainless and weather-rated polymer options tend to handle exposure better than standard indoor cabinetry.
- Flooring: Go for slip resistance and drainage. A beautiful surface that turns into a rink after a rainstorm is a mood killer.
And if you’re building near anything combustible—fencing, siding, pergola elements—treat appliance clearances like a hard constraint, not a suggestion.
A practical checklist before you buy anything expensive
- Pick your “default meal” (burgers? tacos? pizza?) and design around that workflow
- Choose a location with comfortable traffic flow to the house and bathroom
- Confirm grill placement won’t violate clearance/safety guidance and won’t trap heat or smoke
- Decide if you need a sink, fridge, or ice maker (and what that means for plumbing/drainage)
- Map lighting: task light at the grill + softer light at the table
- Plan weather control: shade, wind break, or a covered dining zone
- Budget for “unsexy” items: electrical, gas line work, permits, and proper ventilation where relevant
FAQ
Do I need a sink in an outdoor kitchen?
Not always, but even a small sink can reduce trips inside and make food prep/cleanup easier—especially when you host.
What’s the smartest way to place the grill?
Put it where smoke won’t blow into seating areas and where it’s safely away from structures and combustibles; follow manufacturer clearance requirements.
Is a pergola or roof over the cooking area a good idea?
Shade is great, but heat and smoke need a plan. Confirm appliance clearances and consider how airflow works so you’re not trapping heat overhead.
How do I make it feel cozy at night?
Layer lighting: bright task lighting where you cook, softer lighting near dining, and a warm focal point (fire pit or patio heater) where people linger.
One planning resource worth bookmarking
This Old House has a straightforward outdoor kitchen planning guide that’s useful for thinking through layout, materials, and feature trade-offs before you start buying appliances. You can use it as a quick “pre-build checklist” before you price anything out—especially to sanity-check layout, utility needs, and what’s worth paying for versus DIY. If you skim just one part, focus on the planning and placement tips; they’ll save you the most headaches later.
Conclusion
A great outdoor kitchen is less about “more stuff” and more about placement, flow, and durability. Design around how you actually cook and how people actually gather, then let safety and weatherproofing guide the details. Start simple, wire it for future upgrades, and you’ll end up with a backyard space you use constantly—not just when company’s coming.